Showing posts with label Historical Sew Monthly. Show all posts

Sunday, 17 January 2016

Another HSM Challenge complete (almost!) - Girl's 1850s/1860s underwear

This project took a little longer than anticipated but, after a few mishaps and frustrations, it is (almost) finished. Designing and making children's costumes has been on my list for some time as I love miniature things and the idea of creating a tiny outfit with all of the features of adult 1860s dress, just shorter and cuter, really appealed to me.

I was particularly inspired by photographs, fashion plates and originals like these:

From Pinterest - https://uk.pinterest.com/pin/276760339577371220/
Borrowed from Val's post about little girls dresses at Time Travelling in Costume
An original costume from the FIDM Museum found on Pinterest - https://uk.pinterest.com/pin/54746951697569668/

Modes de Paris 1855 found on Pinterest - https://uk.pinterest.com/pin/321303754637425981/

However, not knowing any little girls who could wear the costumes, it has, for a long time, been just one of those ideas that gets pushed to the bottom of the pile. But, the opening of my Etsy shop encouraged me to start experimenting with some girls' dresses - I may not have little ones to dress up bit hopefully others out there do!

The first step was therefore to create some underwear for the correct silhouette and these are my prototypes pieces. I learnt quite a lot along the way and made a few errors (that I can happily avoid in the future) which I will detail below. As a result, I am not planning to sell these garments at the moment but now that I've got the construction sussed, the new and improved versions will be available soon on Etsy (fingers crossed).


GIRLS' 1850s/1860s UNDERTHINGS - Drawers, Crinoline and Mock Corset Bodice 

For this challenge I have created three undergarments for a girl aged approximately six years old. There are a pair of split drawers, exactly like an adult version just a lot smaller, a hooped crinoline skirt, and in order to support this and make the ensemble more comfortable to wear for a young child, a simple bodice stitched to resemble a child's corset. The crinoline buttons onto the bodice which allows the shoulders to support any weight and prevents any discomfort around the waist. This may not be 100% authentic but, as I am developing these pieces to be worn by modern little girls, I want them to be as wearable as possible.

The Challenge: 
Procrastination. As I mentioned above, tiny little dresses have been something I've thought about sewing for a long time but I never really had any reason to. I did get started on this project just before Christmas though - I had all of my patterns and fabric and so on all ready to go, but then sewing Christmas presents and other general festivities got in the way. When I saw the theme for January was procrastination, I knew right away that this was one of the projects that I wanted to get finished.


Fabric:
The split drawers are cotton lawn with cotton broderie anglais trim. The mock-corset bodice is a stiff cotton twill and for the crinoline I used a remnant of poly cotton broderie anglais that, quite handily, had a deep decorative border on both selvages. Given that the skirt is so short, this meant that I could cut the front and back alongside each other using the borders as a hem on both pieces.

Pattern: 
I used Butterick's 5901 pattern for inspiration and also as a guide for children's sizing as this is something I don't have any previous experience of. I worked quite freely though, only really using the bodice pieces to ensure the correct fit and cutting the other sections myself. I used my own methods for construction and didn't refer to the pattern instructions hardly at all. I also altered the numbers of hoops from three to two, changed the arrangement of tucks on the drawers and created my own system for attaching the crinoline to the bodice rather than having a separate petticoat underneath.


Year: 
Mid-Victorian 1850s-1860s

Notions:
Thread, bias binding, boning tape, 1" flat cotton tape, a shoelace for the drawstring on the drawers, 4 mother of pearl buttons on the bodice, 6 tiny antique buttons for attaching the crinoline to the bodice and boning*.

* A note on polyester boning: This is something that I have always avoided in the past, never believing that it could possibly be strong enough to hold its shape. And I was right! I had decided to use it on this occasion as I thought that it would be both lighter for a young child and more economical. I also, mistakenly, believed that the small size of the crinoline would compensate for the lack of strength in the boning. How wrong I was! The plastic boning was a complete disaster, failing to hold its own shape even without any form of skirt placed over the top of it. I thought at first that adding the second and third bones would help but in actual fact this made matters worse as the bones bent and twisted in different places and tangled themselves up in ways that didn't even look physically and scientifically possible. What's more, when I draped a thin circular cotton skirt over the top to see if balanced weight on all sides would correct the problem the whole thing collapsed!

Badly behaved boning - and that's only one hoop!


Fortunately I had some spiral steel boning on hand for a corset so I removed some of the polyester boning and tried the metal with much better results. The steel held its shape and is not as heavy as I though it would be as what I had was 7mm spiral steel rather than the wider spring steel I usually use for crinolines. I have therefore learnt my lesson and will be replacing the polyester with the steel as soon as I have cleaned it up. Unfortunately I didn't realise it was dirty until I had threaded it through the boning channel and found grey smudging all around the openings, one of the reasons that I will be keeping this set of underwear as a prototype. Especially as my sewing machine helped out by adding some oil to other seams! So once the boning has had a bath in some white spirit I will be able to replace the bones for a sturdier crinoline.


How historically accurate is it?
Overall the shape and silhouette are accurate. The drawers are just a miniature copy of adult split drawers with the exception of being longer and showing beneath the dress, a style that is often seen in period photographs, especially on younger girls. Similarly the crinoline creates the correct shape and the bodice does echo the shape of some extant children's corsets that I have seen. However, it is not actually a corset (I simply stitched lines to imitate boning channels) and I am not sure about the system for buttoning the crinoline onto the bodice. Having said that, many children's corsets did button rather than lace and it doesn't seem impossible that the crinoline would have been attached to the corset in some way as this was not unheard of in adult dress and would have made life easier for the child. As for the materials, the use of cotton for the bodice and drawers is accurate, but the broderie anglais poly cotton is not. This was a more commercial choice on my part in order to make the ensemble prettier without spending hours adding tucks and lace and so on. However, in future I will be looking at creating completely accurate ensembles as well so that people have the choice based on what they need the costumes for. It should also be noted that for a more authentic look a chemise should really be worn underneath these as well as a modesty petticoat.

A close up of the buttons and the stitched mock boning channels

Hours to complete:
In total probably about 6 or 7 but this involved a fair amount of thinking, figuring things out, experimenting and fighting with boning as well as tracing and drafting pattern pieces.

Tiny tucks and lace on the hems of the drawers


First worn:
I haven't yet found a little model this size and I don't have a child-sized dress form so the dress has only been modelled by my wastepaper basket! This is a trick I have used before when sewing an 1850s skirt for a young lady with a 24" waist. This was far too small for my mannequin but I needed to pleat the skirt directly onto a waistband placed around a body form. The only thing that I could find with the correct circumference that I could balance on my mannequin stand was an upside down wastepaper basket. And it actually worked quite well for modelling this dress. The twill bodice is quite stiff and the decorative stitching helped reinforce it to stand up by itself so I could get some good pictures.

My mannequin - a wastepaper basket balanced upside down on the feet for my dressform!

Total cost: 
All of the materials that I used were from my stash, with the exception of the steel boning. My estimated cost for these if I had to buy them is around £15, although I haven't yet completed my official calculations for pricing the items.


All in all this has been an exciting project and I'm glad that the procrastination theme encouraged me to get stuck in with this one. I can't wait to start designing and making dresses to go over these little ensembles and I am also planning to experiment with drafting more authentic ensembles with chemises and proper quilted or corded children's corsets. Watch this space!

Wednesday, 6 January 2016

A brilliant start to a new year

My New Year got off to an excellent start when I logged into my blog a couple of days ago and discovered, much to my excitement, that I had been nominated for the Liebster Award by Hannah S at Fact and Fiction.


This was such a nice surprise and it is so rewarding to know that people are actually seeing and appreciating my costumes, especially as it was reading blogs like The Fashionable Past that really inspired me to begin sewing historical clothing and sharing my efforts online. So a huge thankyou to Hannah and everyone else who reads my blog as well as to all the bloggers that I follow for sharing your inspirational work and making me so envious that I just had to join in!

To borrow from Hannah's page, the award rules are as follows:

1. Acknowledge the blog that nominated you.
2. Answer the questions the nominating blogger asked.
3. List 11 bloggers with less than 200 followers that deserve some recognition.
4. Write 11 questions for them to answer.
5. Notify them that they have been nominated.

However, I will save this for a future post as I would like to sit down and answer the questions properly and I will also need a little time to make my own eleven nominations...

To return to the subject of the New Year then, I am very pleased to announce that I have been sticking to my New Year's resolution to sew more, to sew more often, to sew faster etc. etc. and to complete all of the Historical Sew Monthly challenges with my first creation of the year: an 1840s bonnet.


The theme for January is procrastination, something which, as it happens, I have a particular talent for. I therefore had no shortage of options when it came to selecting a project for this category. In fact, I have decided that, in the spirit of New Year's resolutions and the light of my decided failure to complete last year's challenges, I will make the most of this opportunity to complete as many of my unfinished (and in some cases unstarted) projects this month. And seeing as it's only the 6th of the month and the first one is finished I don't think I'm doing too badly!

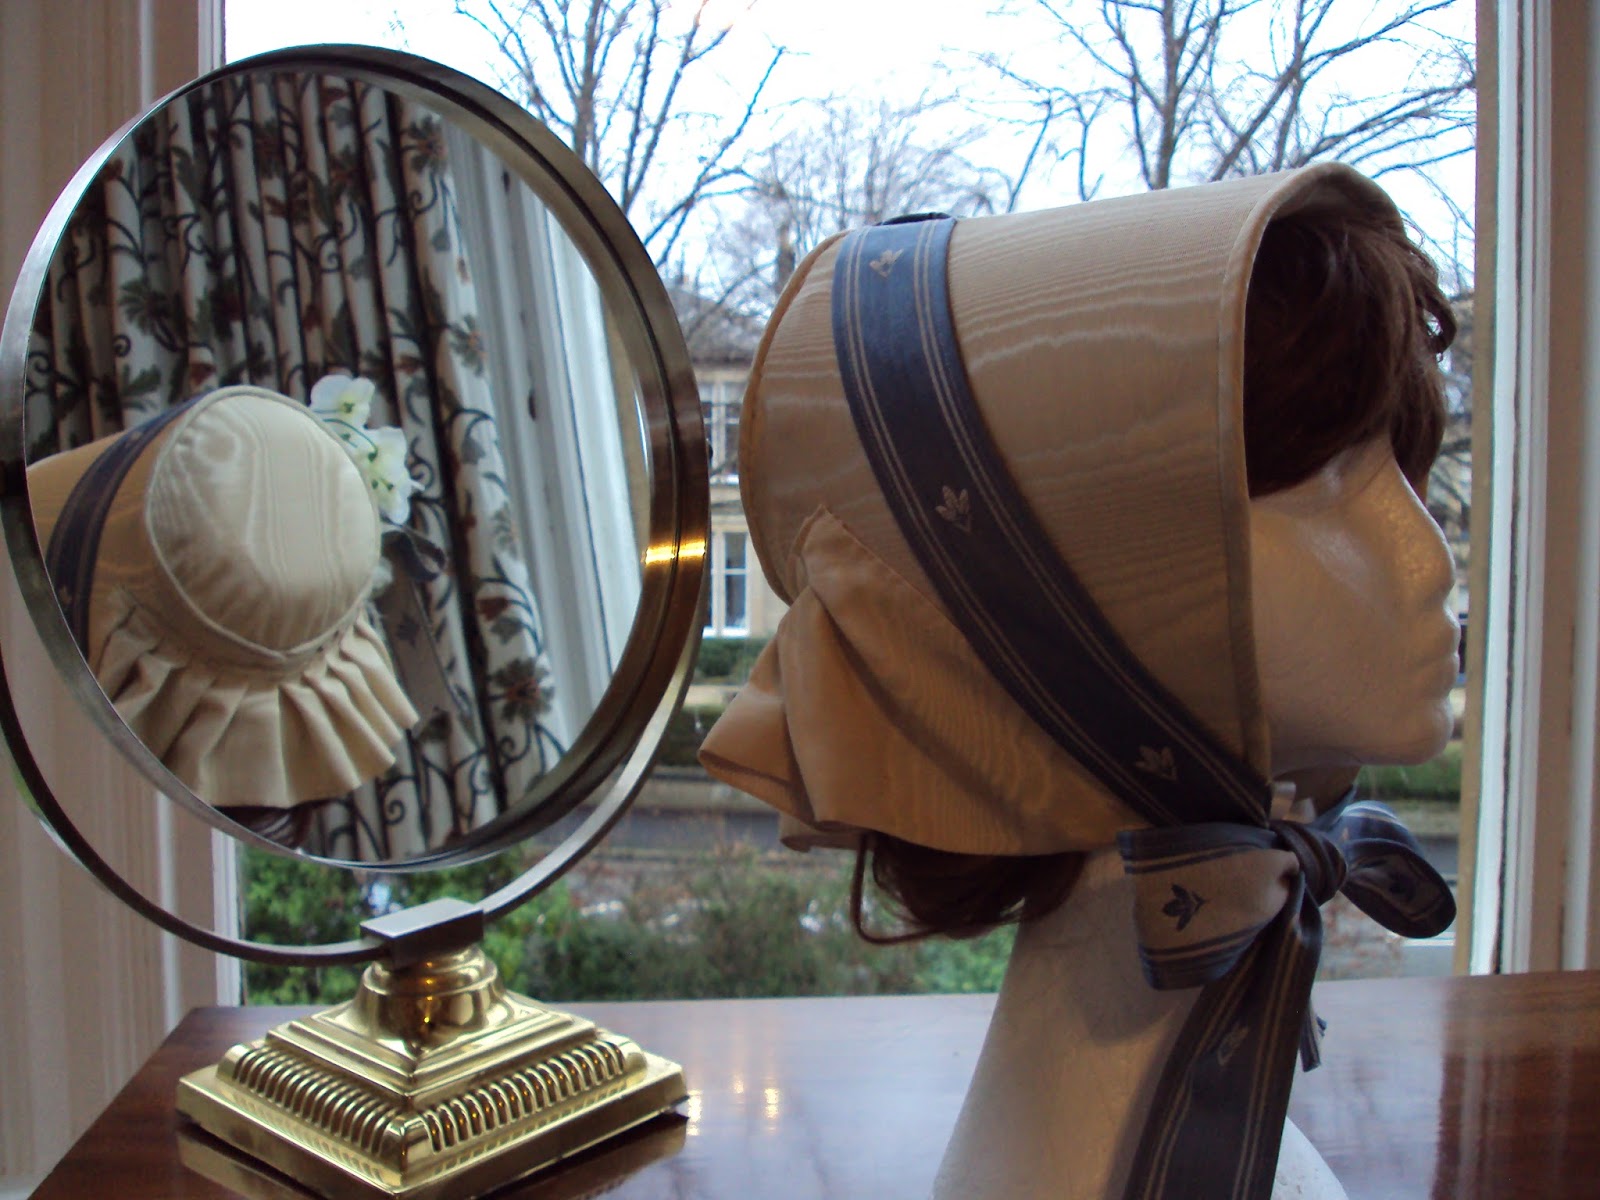
An 1840s moiré silk bonnet 

The item I chose to start with was a bonnet that I have been promising to make for my Mum for ages. We must have had the pattern for at least three years but somehow I never got round to starting the project. Having made some bonnets at the end of last year, however, I decided that the time had come to finally make this one.


The Challenge: Procrastination - this project qualifies by a mile for this challenge - not only has this project been put off for several years, I also originally intended to have it completed as a Christmas present but ran out of time

Material: The foundation of the bonnet is made from buckram and millinery wire. I covered this with a layer of cotton sheeting (from an old sheet) to pad the form and the outer material is moiré effect curtain fabric in a deep oyster cream colour. I am not sure of the fibre content as this was an old fabric remnant given to me by a friend but we think it contains some silk and it looks pretty close to the real thing. The inside of the bonnet is lined with a fine, cream silk satin.


Pattern: The pattern is Timely Tresses "Lavinia Ruth" and I used the 1840s version of the pattern. I have really enjoyed using Timely Tresses patterns to learn about the techniques for constructing bonnets and am looking forward to using the knowledge that I have gained, along with the experience I gained examining extant bonnets first hand for my Masters dissertation, to begin developing my own patterns for bonnets of different shapes and sizes.


Year: late 1840s - although the shape of this bonnet is very typical of the 1840s, it's smaller size which reveals the profile of the face is already hinting at the later styles of the 1850s.

Notions: To decorate the bonnet I used a long strip of curtaining fabric (left over from a traditional 1950s style men's dressing gown that my Mum made for my brother) to make the ties. I wanted to use the striped pattern and the woven design to create the ribbons as the pattern reminded me of some of the extant ribbons that I saw during my research and it is really difficult to source ribbons that are anything like the ones available in the 19th century. Furthermore, on the extant bonnets that I had the good fortune to be able to study up close, a fair number had ribbons that were made from hemmed silk so I was happy with this being an authentic period approach. I also used some artificial flowers from my stash (unfortunately plastic - I have secret plans to begin making flowers myself that are more authentic...watch this space!) and a small amount of narrow satin ribbon for the secondary utility ties and gathering the lining into the back of the tip. Oh, and thread of course!


How historically accurate is it? With the exception of flowers and the uncertain fibre content of the fabric, almost 100%. I sewed the bonnet entirely by hand and all of the construction techniques were based on the well-researched instructions provided with the pattern and my own observations of original bonnets. The decoration was also inspired by my research which involved looking at original bonnet and ribbons and their representation in fashion plates. I tried to get as authentic a look as I could and was only held back by the modernity of some of my materials. I am quite confident that an 1840s lady would know exactly what she was looking at though so I am happy to settle at 85%. (If only the flowers did not have plastic stems - grrrrr!)

Hours to complete: Approximately 16 - this seems to be my average time for a bonnet, until I set a new record.


First worn: I tried the bonnet on several times throughout the making process to make sure that everything was level, in the right place, the right size etc. but this bonnet is for my Mum so it's first outing will probably be in the summer as the colours were chosen to coordinate with a summer dress.

Total cost: We originally paid about $35 for the kit to make this bonnet. This included the pattern though and over three kits I have been able to save a fair amount of buckram and wire that I have used in other projects. The cost of the foundation materials was therefore probably around $20 but it was paid so long ago that they probably qualify as stash materials. Everything else I used was also from my stash. So either £0 or $20 if you consider the fact that the buckram etc. wasn't left over but used for the purpose it was bought for.


And now it's onwards to the next project but first I have to decide whether that's going to be an 1880s corset to replace my 1850s-does-everything-1850-1950-straight-seamed-now-too-large-corset or the girl's 1860s ensemble (including underwear) that I have been planning for my shop. It all depends on whether my parcel of corset fabric and other goodies arrives in the post tomorrow...

Saturday, 3 October 2015

Historical Sew Monthly: June and July: A new accessory...

My new bonnet seemed like the perfect entry for June and July's challenges: "Out of your comfort zone" and "Accessorize". The bonnet was one of the most indispensable of all Victorian accessories and this was my first foray into the fascinating and rewarding world of historical millinery.


The Challenge:
June - Out-of-your-comfort-zone
July - Accessorise

And technically this also qualifies for March's stash-busting challenge as I was so eager to get started with this project that I deliberately planned to use only materials that I already had to hand without ordering anything new.

Fabric:

 The fabric is a synthetic curtaining fabric that has a very nice finish that looks the part without costing the earth. It is a light fabric and nice to handle and sits well. 


Pattern: 

I used Timely Tresses "Eliza Coretta" pattern to create this bonnet.

Year: 

1860-1862

Notions:

Millinery seems to involve a whole host of bits and pieces:

For the structure of the bonnet I used buckram for the headpiece and tip and millinery wire covered in net to form the brim.

The decorations consist of ruffled synthetic white lace; artificial flowers (fabric and plastic); small satin ribbon bows; and gros-grain ribbon ties formed from two pieces of antique ribbon in different shades. 

How historically accurate is it?

The shape and style of the bonnet are very accurate for this period. Timely Tresses' patterns are very well-researched and based on extant bonnets. The decoration is also based on my own research into original bonnets and closely follows the tastes and trends of the period and the construction techniques are authentic. With the exception of the bavolet (curtain) hem, the whole bonnet is hand sewn. However, the majority of the materials are modern substitutes. The gros-grain ties are nineteenth-century antique ribbons but the main bonnet fabric and decorations are made of synthetic materials chosen with an eye to achieving as authentic a look as possible with available materials and without breaking the bank!

Hours to complete:

Approximately sixteen hours in total spread over three days.

First worn:

I wore the bonnet briefly to try the overall effect in the mirror but I will be selling the bonnet. When I started out, I had originally intended to wear this bonnet with my 1850s walking dress which is made in the same material. However, I got a little carried away combining lace and flowers when I was trimming the bonnet and although the look is very authentic it is now a little too frilly and floral to go with the dress. Hopefully somebody else will have a dress just waiting for the perfect accessory or maybe it will inspire a new costume for somebody.

If you are interested in this bonnet and other items, please visit my sister blog: http://la-belle-modiste.blogspot.co.uk/


Total cost:
I don't have an exact figure as all of the materials that I used for this bonnet were bought some time ago. However, including the kit with the materials for the frame, the fabric and the decorations, I would estimate something in the region of £40-50 for the materials.


Historical Sew Monthly: January and February: A blue foundation garment...

So here they are finally: the details for my first HSM challenge.


The Challenge:
I decided to combine January's Foundation Challenge and February's Colour Blue Challenge for my first project and so I chose to make blue garters.

Fabric:
I chose a Rowan pure wool 4 ply yarn in a shade called Blue Iris.

Pattern: 
The pattern is an original from Godey's Ladies' Book (1861) that I found here. It is very simple and easy to follow.

Year: 
1861

Notions:
The great thing about this project was that, unlike most of my costume projects, it required only a small amount of yarn and a piece of cardboard to make to pompom, so very economical.

How historically accurate is it?
The end result is quite historically accurate as the pattern was original. I suspect that the yarn is probably spun differently nowadays but I deliberately chose pure wool to keep the fibres as authentic as possible.

Hours to complete:
Only a few. I haven't actually completed the second garter yet but this first one only took a couple of hours, split into 10 minute bursts here and there whenever I had a chance.

First worn:
I haven't worn this yet as the second one isn't finished, but as soon as its partner is complete I want to test them out on my period correct stockings. I am dubious about how effective they will be but it is the look that counts and I can use them during costume demonstrations.

Total cost:
Almost nothing. The wool cost about £4 but I have only used a small amount - there is plenty left for more garters or another small project.


The proof that being over ambitious does not always pay off...

Back in February I decided for some reason that it would be a good idea to join the Historical Sew Monthly. I knew then that in the middle of studying for a Masters Degree in Dress and Textile Histories that I was unlikely to have a lot of time for sewing. However, as it turns out, I seriously underestimated just how little time I would have for anything else once I started researching and writing my dissertation!

After spending March and April on a museum work placement, I then launched into my research into Victorian bonnet ribbons and from April until August I hunted down, photographed, analysed, read and wrote about ribbons from dawn to dusk, seven days a week without fail! But not once in all those months did I even get close to so much as sewing a ribbon onto anything!

Now though, with my masters complete and the dissertation submitted I am eager to get back to my sewing. Sadly, however, I have to report that the progress on my first HSM project currently amounts to one lonely garter!

And here it is...


See my next post for the full details...

Wednesday, 4 February 2015

My first Historical Sew Monthly Project...

I have decided that my first project for the Historical Sew Monthly will be a pair of 1860s knitted garters.

I wanted a small project that I can fit in easily between other commitments to get me started and knitting seemed to fit the bill perfectly. That's when I remembered this pattern from Godey's Lady's book that I found at World Turn'd Upside Down some time ago and bookmarked thinking that it would come in handy some day...

And it has. I have finally got round to investing in my first proper pair of stockings from Nelhelenia Patterns with some money that I got for Christmas and so this project is perfect. Also, it means that I can technically hit two birds with one stone. I have chosen a Rowan pure wool yarn in a beautiful shade called Blue Iris that means I can enter the garters for the February colour challenge but they will also make up for the January challenge that I missed. Taking foundations to mean "the thing that holds everything up" I think garters probably qualify...

So here are some pictures of my lovely wool and my progress so far:

I love the colour of this wool and it is nice to work with too

Not too bad for about an hours work spread over a couple of days - the rows are so short that I can just do 10 minutes here and there and it grows nicely

Saturday, 31 January 2015

Motivation or Madness?

I haven't had the chance to sew properly for months and I am nowhere near my goal of posting my backlog of un-shared costumes...BUT...

I have decided to join The Historical Sew Monthly 2015!


I am still not convinced that this is an entirely good idea considering the amount of studying I have to do and the fact that I have to produce a Masters dissertation by the end of August. However, it is something that I have always wanted to do.

I started to make costumes about 2 years ago and one of the main things that spurred me on to finally do something I’d always dreamed of was reading other costumer’s blogs. I especially enjoyed seeing the things that people had made for challenges like the Historical Sew Challenge and I love the idea of sharing projects with a common goal.

So I am hoping that the challenges will motivate me to produce at least some small items this year in between my studies. Unfortunately I have already missed January but I know that I won't be able to complete all of the challenges this year. That really would be madness!! However, after careful contemplation of the list I think a minimum of four challenges is a good starting point…And maybe I can combine some of the challenges and cover more of them with a 2-in-1 approach. We'll see...

Anyway here is the list:


I already have some ideas brewing for ways of combining January and February and creating a small blue foundation garment... But more to follow on that later. Now I have to make a start on some real work!