Wednesday, 6 January 2016

A brilliant start to a new year

My New Year got off to an excellent start when I logged into my blog a couple of days ago and discovered, much to my excitement, that I had been nominated for the Liebster Award by Hannah S at Fact and Fiction.


This was such a nice surprise and it is so rewarding to know that people are actually seeing and appreciating my costumes, especially as it was reading blogs like The Fashionable Past that really inspired me to begin sewing historical clothing and sharing my efforts online. So a huge thankyou to Hannah and everyone else who reads my blog as well as to all the bloggers that I follow for sharing your inspirational work and making me so envious that I just had to join in!

To borrow from Hannah's page, the award rules are as follows:

1. Acknowledge the blog that nominated you.
2. Answer the questions the nominating blogger asked.
3. List 11 bloggers with less than 200 followers that deserve some recognition.
4. Write 11 questions for them to answer.
5. Notify them that they have been nominated.

However, I will save this for a future post as I would like to sit down and answer the questions properly and I will also need a little time to make my own eleven nominations...

To return to the subject of the New Year then, I am very pleased to announce that I have been sticking to my New Year's resolution to sew more, to sew more often, to sew faster etc. etc. and to complete all of the Historical Sew Monthly challenges with my first creation of the year: an 1840s bonnet.


The theme for January is procrastination, something which, as it happens, I have a particular talent for. I therefore had no shortage of options when it came to selecting a project for this category. In fact, I have decided that, in the spirit of New Year's resolutions and the light of my decided failure to complete last year's challenges, I will make the most of this opportunity to complete as many of my unfinished (and in some cases unstarted) projects this month. And seeing as it's only the 6th of the month and the first one is finished I don't think I'm doing too badly!

An 1840s moiré silk bonnet 

The item I chose to start with was a bonnet that I have been promising to make for my Mum for ages. We must have had the pattern for at least three years but somehow I never got round to starting the project. Having made some bonnets at the end of last year, however, I decided that the time had come to finally make this one.


The Challenge: Procrastination - this project qualifies by a mile for this challenge - not only has this project been put off for several years, I also originally intended to have it completed as a Christmas present but ran out of time

Material: The foundation of the bonnet is made from buckram and millinery wire. I covered this with a layer of cotton sheeting (from an old sheet) to pad the form and the outer material is moiré effect curtain fabric in a deep oyster cream colour. I am not sure of the fibre content as this was an old fabric remnant given to me by a friend but we think it contains some silk and it looks pretty close to the real thing. The inside of the bonnet is lined with a fine, cream silk satin.


Pattern: The pattern is Timely Tresses "Lavinia Ruth" and I used the 1840s version of the pattern. I have really enjoyed using Timely Tresses patterns to learn about the techniques for constructing bonnets and am looking forward to using the knowledge that I have gained, along with the experience I gained examining extant bonnets first hand for my Masters dissertation, to begin developing my own patterns for bonnets of different shapes and sizes.
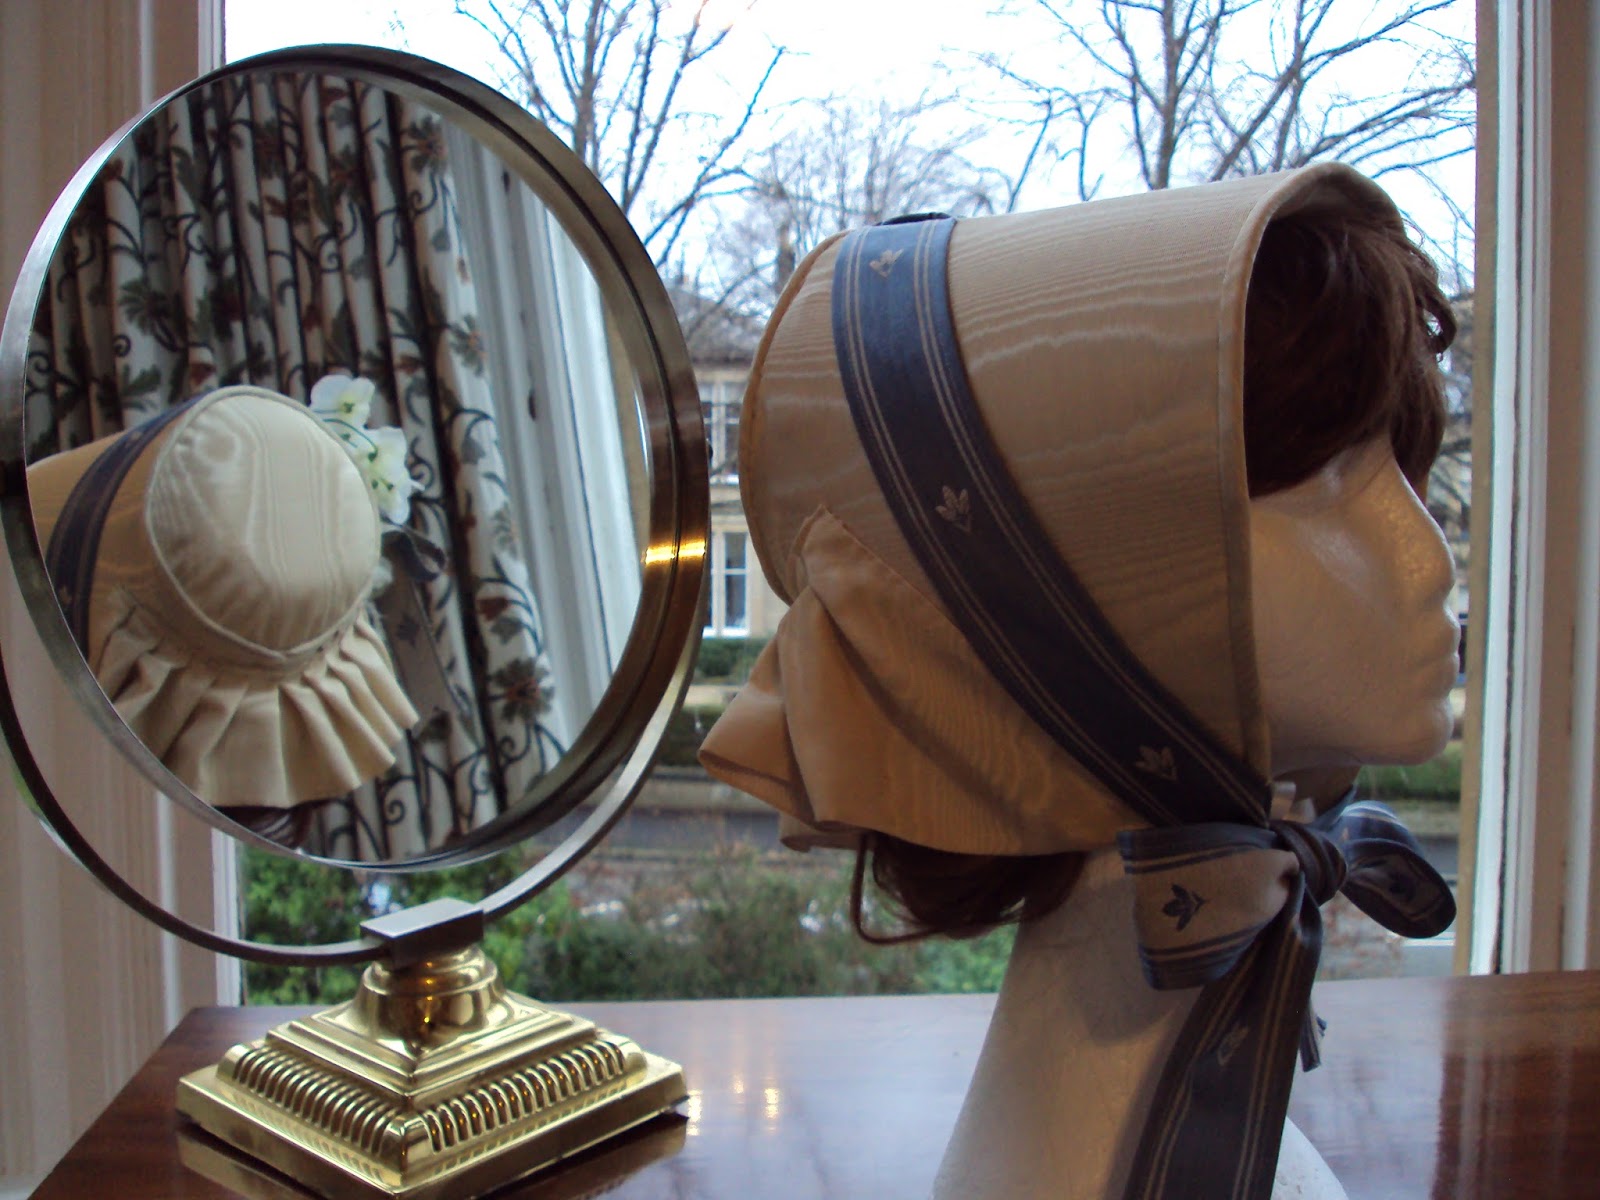

Year: late 1840s - although the shape of this bonnet is very typical of the 1840s, it's smaller size which reveals the profile of the face is already hinting at the later styles of the 1850s.

Notions: To decorate the bonnet I used a long strip of curtaining fabric (left over from a traditional 1950s style men's dressing gown that my Mum made for my brother) to make the ties. I wanted to use the striped pattern and the woven design to create the ribbons as the pattern reminded me of some of the extant ribbons that I saw during my research and it is really difficult to source ribbons that are anything like the ones available in the 19th century. Furthermore, on the extant bonnets that I had the good fortune to be able to study up close, a fair number had ribbons that were made from hemmed silk so I was happy with this being an authentic period approach. I also used some artificial flowers from my stash (unfortunately plastic - I have secret plans to begin making flowers myself that are more authentic...watch this space!) and a small amount of narrow satin ribbon for the secondary utility ties and gathering the lining into the back of the tip. Oh, and thread of course!


How historically accurate is it? With the exception of flowers and the uncertain fibre content of the fabric, almost 100%. I sewed the bonnet entirely by hand and all of the construction techniques were based on the well-researched instructions provided with the pattern and my own observations of original bonnets. The decoration was also inspired by my research which involved looking at original bonnet and ribbons and their representation in fashion plates. I tried to get as authentic a look as I could and was only held back by the modernity of some of my materials. I am quite confident that an 1840s lady would know exactly what she was looking at though so I am happy to settle at 85%. (If only the flowers did not have plastic stems - grrrrr!)

Hours to complete: Approximately 16 - this seems to be my average time for a bonnet, until I set a new record.


First worn: I tried the bonnet on several times throughout the making process to make sure that everything was level, in the right place, the right size etc. but this bonnet is for my Mum so it's first outing will probably be in the summer as the colours were chosen to coordinate with a summer dress.

Total cost: We originally paid about $35 for the kit to make this bonnet. This included the pattern though and over three kits I have been able to save a fair amount of buckram and wire that I have used in other projects. The cost of the foundation materials was therefore probably around $20 but it was paid so long ago that they probably qualify as stash materials. Everything else I used was also from my stash. So either £0 or $20 if you consider the fact that the buckram etc. wasn't left over but used for the purpose it was bought for.


And now it's onwards to the next project but first I have to decide whether that's going to be an 1880s corset to replace my 1850s-does-everything-1850-1950-straight-seamed-now-too-large-corset or the girl's 1860s ensemble (including underwear) that I have been planning for my shop. It all depends on whether my parcel of corset fabric and other goodies arrives in the post tomorrow...

Friday, 1 January 2016

Happy New Year!

It's 2016 and I can't believe I've actually done it! I wanted to have all of my past costumes uploaded by the New Year and this is the last one. I saved the best 'til last and it seemed fitting to have a ballgown for New Year.


This is my latest ballgown that I completed two summers ago. I wanted a new gown as I didn't want to wear the same dress as the year before to the same event but I also wanted a project that wasn't going to break the bank. Since the ball was in the summer, a muslin dress therefore seemed the obvious choice.

The bodice was made using the same Truly Victorian pattern (TV442) as my first Victorian ballgown, but instead of using the bertha I applied some beautiful wide cotton leavers lace to the neckline. I didn't use a pattern for the skirt - this was simply a huge rectangle of fabric cut from three widths of fabric, pleated onto the waistband on my dress form. To add a little weight and structure to the hem I made three deep tucks at the bottom. This really created a beautiful swirl when dancing as the whole skirt lifted up when I twirled - such fun!!

I also made two different sashes and flower posies to pin at the neckline so that I could wear the dress to more than one ball. One was of fushia coloured satin in a simple bow and the second was a dark green and blue tartan sash stolen from a later 1870s pattern, that created a waterfall look at the back - unfortunately I don't have any good pictures of this so that will have to be saved for a future photo shoot.


So there we have it - I am now up to date and ready to start sewing and posting in real time as I begin some new and exciting projects.

Wishing everyone a very happy New Year and especially happy sewing...

Sunday, 27 December 2015

Countdown to New Year No3: Two 1940s frocks

As well as Victorian fashion and re-enactment, I also love 1940s events and styles. These are just two of the dresses I have made for World War II events. A lot of my everyday wardrobe is based on 1940s and 1950s patterns and styles but these dresses were made specifically for costumed events - the day dress for attending a vintage car rally (dress just right and you can usually hitch a ride in a very nice car!) and the black and red ensemble for a "Down in the Shelters" dance evening. Having said that, I have worn both of them since for other things too - I like wearing them so much!


I can't find the patterns that I used right now, but both were original 1940s patterns, featuring typical narrow skirts and interesting details on the bodices and sleeves. I love working with originals from this era - they always fit me so well and make up easily. Modern patterns seem to have so many things that don't quite match up or fit but 1940s patterns are so easy to work with.

Making a friend...
Car shopping!!
Ooh...naughty!
Both of these dresses were made using printed cottons found in local fabric stores. I knew I wanted to make a 1940s dress with the brown as soon as I saw it and as for the red tulips, I just couldn't leave that in the store. The brown has a nice crisp cotton finish but the black and red has a soft, silky texture that made it just perfect for an evening dress.


The pattern I chose also included a jacket which I made in black velvet - unfortunately in these pictures it is obscuring the beautiful sweetheart neckline of the dress. Still, I love these pictures...


And that leaves just one more post to go in my countdown to the New Year. I will finally have shared all of my past costumes and be ready to begin the New Year as I mean to go on with lots of new and exciting projects.

Countdown to New Year No2: An 1860s picnic outfit


This outfit was planned for a Victorian picnic on the Isle of Wight. As mentioned in my previous post, I had chosen to make a Garibaldi blouse to wear with a crinoline skirt. I felt that this 1860s fashion was perfect for the relaxed atmosphere of a picnic as well as being light and comfortable for wearing outdoors in hot weather. I used Truly Victorian's TV441 1861 Garibaldi Blouse Pattern to draft the blouse and then added my own touch by hand embroidering the front yoke panels.


To do this I took another piece of the same cotton, wider than the pattern piece and created rows of tiny vertical pin tucks. Between these I removed some of the vertical threads to create drawn-thread embroidery. I then cut out the pattern piece from these prepared pieces of fabric and basted them to the plain cotton piece for support and made up the blouse as per the instructions.

 I finished the neck, yoke edge and cuffs with cotton tape that was box pleated with the edges of each pleat caught together in the centre to create a three-dimensional effect. This was based on some trimming ideas that I came across in an 1860s magazine. It took time and perseverance to complete but was well worth the effort in the end.


I wore the blouse with a very large pleated crinoline skirt. I miscalculated when I was cutting the skirt and accidentally made it up with four panels ( cut from the full width of my cotton-rich curtaining fabric) when I only really needed three. The result is a luxuriously full skirt that really captures the size and scale of an 1860s skirt even when worn over a smaller, round crinoline. It is heavy to wear but I enjoy the look that it creates. I finished the waist with a sash sewn from pleated cheap pashmina scarves.


And doesn't it look beautiful set against the sea...If only this photograph was a painting!
Perhaps something like this by Eugène Louis Boudin

The Beach at Trouville, the Empress Eugénie

by Eugène Louis Boudin


Saturday, 26 December 2015

Countdown to New Year No1: an 1860s Garibaldi blouse


Last summer I decided to make a Garibaldi blouse or Canezou with drawn thread embroidery. Before spending hours on the embroidery, I made up a test version of the blouse using plain cotton curtain lining. As it turned out, this made a nice and lighter alternative to the fringed bodice of my walking costume and teams very nicely with the skirt. These are some of the pictures that we took of the ensemble at St Mildred's Church, Whippingham on the Isle of Wight, Queen Victoria's chapel when she stayed at Osbourne House.


Oh dear, can it really be Boxing day already?!

I have been absent from this blog for some time now for a number of reasons. During November I put all of my projects on hold in order to complete a special dress for my Masters graduation and no sooner had I completed the dress and worn it for my special day than my sewing machine was requisitioned by Christmas Elves who have been occupying the workshop ever since! I have not, therefore, been idle but was unfortunately a little short of time for sharing.

I did, however, make a resolution to post all of my completed costumes before the end of the year, which leaves me only a few days to keep my promise to myself and to share all of my remaining photographs.

I thought I would start with the graduation dress. I didn't post these immediately because I was saving the dress as a surprise for my Mum. She knew I was making a dress but I didn't tell her anything about it.

I purchased the pattern from the Vintage Pattern Shop on ebay. It is a beautiful late 1950s wedding dress pattern, but made up in the shorter length it makes a stunning evening or occasion dress.


I was especially drawn to the way the back is cut and the beautiful double pleats. My dress had to be in a dark colour so I chose navy blue. I was very lucky to find a really lovely quilting cotton in my local fabric store with an overall pattern in a slightly lighter blue. It is excellent quality and has a lovely drape.


The dress took quite a while to complete as I decided to make a test version up first in some fabric that I had in my stash. Just as well I did though as there were a few alterations I had to make. The pattern was a size too small so I had to let out the bust and hips. Also, when I tried on the dress for the first time the bust didn't fit right no matter what bra I tried it with. That was until I thought to try it with my Victorian corset. Turns out the shape was absolutely perfect (and when you think about it the 1850s and 1950s silhouettes are quite similar and corsets were still fashionable in the 1950s). Wearing it with corset also meant that I was able to take in the waist to create a very Dior-esque New Look silhouette!


All in all, I was very pleased with the way the dress turned out. I wore it with two 1950s style net petticoats to hold out the skirts and it was a real joy to wear - comfortable because it fitted so well and undeniably glamorous. The perfect dress for a perfect day.


Monday, 7 December 2015

New Shop

News Flash: La Belle Modiste has now opened a new shop on Etsy. Click here to see the items I currently have for sale....